Installing Frame Sliders
| Items Needed: | 1. Drill, a 3/32" drill bit, and a 2" hole saw (verify hole saw size with slider) |
| 2. A metric ratchet set. | |
| 3. Tools to remove fairings. | |
| 4. Torque wrench | |
| 5. Utility knife. | |
| 6. A rotary type tool, such as a Dremel | |
| 7. A magic marker (Sharpie) or some Play Doe. | |
| 8. A block of wood. | |
| 9. Touch-up color matched paint. | |
| 10. Another person to help hold pieces. | |
| 11. Your new sliders. | |
| You'll also what a clean work area and someplace soft to set body panels on so they won't get damaged. | |
Estimates: |
Time: Once you have everything, give yourself a day. |
|
Cost: ~$5 - $10 USD for a 2" hole saw. ~$50 - $150 USD for sliders. |
|
One note of advice to everyone is to only work on one side at a time. From personal experience, this is a good idea. It helps keep things from getting mixed up as well as serving as a reference point! |
|
Most bikes now have their bodywork in 3 pieces per side; upper, middle, and lower. On some bikes, such as the R6, removing the lower is easier to do as one piece. If you are unsure, use a shop manual. In most cases, the hole will have to be made on the middle fairing.
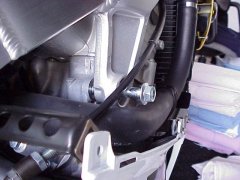
This is where the new bolt and frame slider will go.

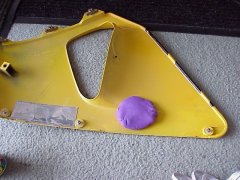
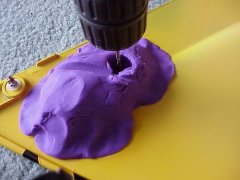
This is where you can do either of 2 things, use a marker to make the marks on the inside of the fairing, or use PlayDoe, Nutty Putty, or something like that. I prefer the PlayDoe way. If you decide to use the marker, a Sharpie works the best. You'll have to cut it in half and insert it where the bolt is.
Don't leave the bolt too far out, you need to get proper fairing positioning.
You'll want to place it around the area of where the frame slider bolt will be sticking out of. Make sure to use your leg or some soft cloth or carpet as to not scratch the paint.
Another option is to cut down a "Sharpie" type marker so about there's only a 1" left below the cap (tape over the cut end). Take the cap off, insert that in the hole, install the bodywork, slide the marker out until it touches the body, making a mark.
You'll want to nearly use all the bolts and screws that came off to get the correct placement. Once you've done this, remove it again.
Place a piece of wood with some fabric or carpet down and lay the fairing on that to drill. You'll want to drill directly in the center of the impression.
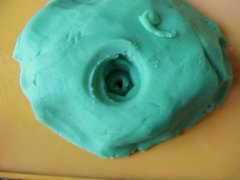
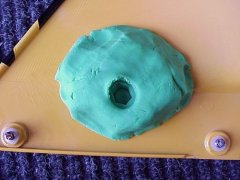
Remove the PlayDoe and reinstall the fairing, this will make sure you are correct, you should see the bolt through the hole (use a flashlight if needed), or use a long needle and verify you are hitting the bolt almost if not dead on.
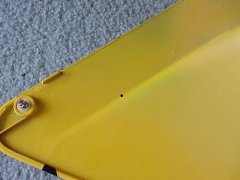
Tape the painted side with masking tape or duct tape to make a cleaner cut and poke a hole.
CUT from painted side.
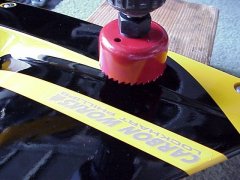
Place the fairing on the wood with the fabric over it. It's better if someone helps hold the fairing to help keep it secure.
Place the center drill bit (Mandrel) dead on the pilot hole. Drill slowly, high rpm's will only melt and destroy it. Take you time, go slow!
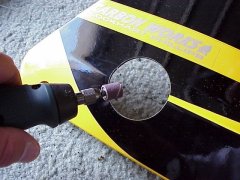
Clean up the cut using a Dremel type rotary tool, although a utility knife can also be used. Do this from the same side you cut from, the front painted side. Go slow, gentle, and take your time.
Use some marker or your touch-up paint to clean up the inside of the hole depending on the color you need.
When tightening the bolt, USE A TORQUE WRENCH and use the right torque amount. VERY important. Also apply a bit of Locktite to the bolt threads.
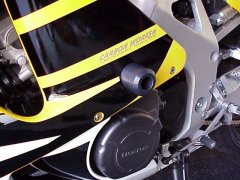
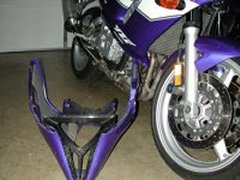
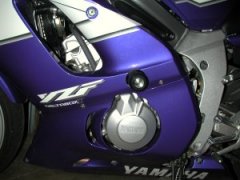
Here's one on a R6:
Special Thanks To:
-People on Sportbikeworld.com for pictures and advice.
-People on R6MessageNet.com for pictures and advice as well.
-EliR6 from R6MessageNet for the R6 pics!